 SEGLY
SEGLY
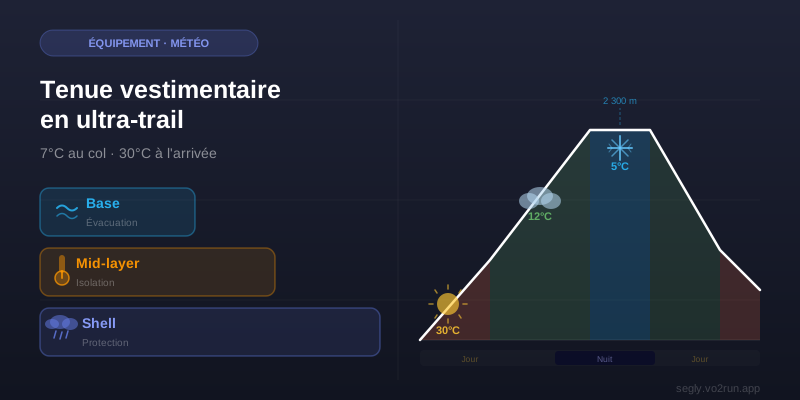
On a mountain ultra, you can go from 7°C in the rain at a 2,000-meter pass to 30°C in full sun at the finish line down in the valley—all in the same day. Wearing gear suited to the general weather conditions is no longer enough. What you need is to know how to manage your gear segment by segment, just as you manage your pace or nutrition.
This guide covers practical tips to ensure you’re never too hot or too cold at the wrong time.
The most common mistake: thinking in terms of a “race outfit” rather than a “course-specific outfit”
Most runners choose their outfit the night before by checking the general weather forecast for the race. The problem: a general forecast of 18°C tells you nothing about what it’ll be like on a mountain pass at 2,300 meters above sea level at 3 a.m., or how hot you’ll get on a south-facing singletrack at noon.
The classic mistake: setting out in a T-shirt because it’s 22°C at the start, only to find yourself shivering four hours later at high altitude without a warm layer. Or the opposite: overpacking your bag with extra layers out of an excess of caution and sweating profusely during the first few hours, arriving at the technical sections already exhausted.
The 3-Layer System: The Foundation to Master
The 3-layer principle is the gold standard in the mountains, and it applies perfectly to ultra-trails. The idea: each layer has a specific role, and the whole system adapts to conditions by combining or removing layers.
Layer 1—The Base Layer: Wicking Away Sweat
This is the layer in direct contact with your skin. Its sole purpose: to wick moisture away from your body to prevent you from getting soaked in sweat right from the first climb.
- Recommended material: quick-drying synthetic fabric or merino wool
- What to absolutely avoid: cotton, which traps moisture and causes you to cool down rapidly
- In summer or hot weather: a short-sleeved technical T-shirt is sufficient
- At high altitudes or at night: opt for long sleeves—mandatory on the UTMB, useful everywhere else
Layer 2 — Insulation: Retain Heat
Lightweight fleece, long-sleeved thermal shirt, or mid-layer: this layer creates a thermal barrier between your skin and the outside. It should only be worn when the temperature drops significantly—on mountain passes, at night, or on high-altitude sections.
- The advantage of a mid-layer: it packs down easily into your pack
- Field tip: Opt for two lightweight layers (base layer + lightweight mid-layer) instead of a single thick garment—that way, you can adjust as needed
Layer 3 — Protection: blocking wind and rain
The windbreaker or rain jacket. This is often the most expensive piece of gear—and the most useful. It’s important to distinguish between the two: a windbreaker is ultralight and packable, sufficient for gusts of wind and fast descents in dry weather. A rain jacket (with a Gore-Tex membrane or equivalent) is essential if rain is forecast, featuring taped seams and an adjustable hood.
In ultramarathons, a waterproof jacket is part of the mandatory gear for most races. Choose one that’s lightweight, packable, and brightly colored so you’re visible in the mountains.
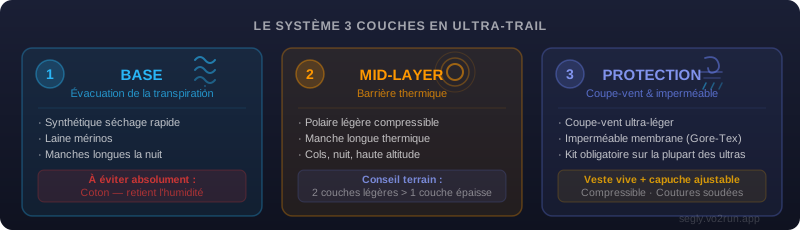
The 3 layers and their respective roles. Each layer can be added or removed depending on the conditions of the specific segment, not the entire race.
Adapting your outfit to the weather: the reference chart
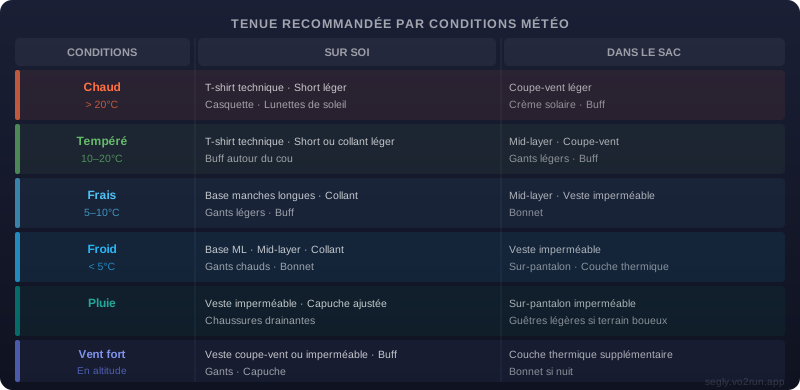
Quick reference by weather conditions—to be used segment by segment, not for the entire race.
Managing gear in your pack: the art of organization
On an ultra, you can’t afford to empty your pack at every pass just to find your beanie. Organizing the contents is just as important as choosing the right gear.
- Immediate access (front vest pockets or outer pocket): food, phone, spare headlamp, lightweight gloves, buff. Things you can grab in 5 seconds without stopping.
- Quick access (top of the pack): windbreaker, waterproof jacket, mid-layer. Things you pull out when you stop—at a aid station or a pass—before the cold sets in.
- Occasional access (bottom of the pack): waterproof overpants, spare thermal layer, complete change of clothes. Items you hope you won’t have to take out, but which can make all the difference if the weather takes a turn for the worse.
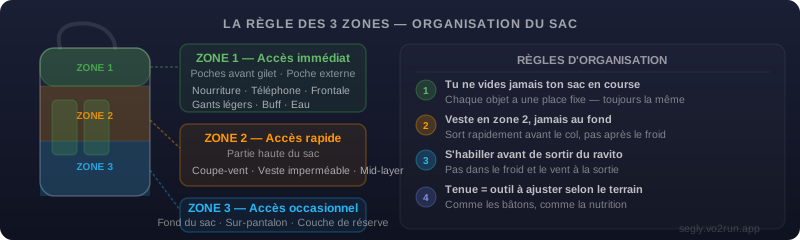
The 3-zone rule applies to all types of trail vests or packs. The goal: to access any item in less than 10 seconds, without stopping if possible.
High-altitude sections: the rules change
In the high mountains, conditions can change in 20 minutes. A clear sky at the start of a pass can quickly become cloudy, windy, or even stormy. It’s not a matter of bad luck—it’s the reality of the alpine terrain.
What changes at high altitudes:
- The wind is often much stronger than expected, even without precipitation
- Sweat evaporates less easily—moisture builds up under your clothes more quickly
- The descent following the pass often comes quickly, bringing an immediate chill if you don’t add a layer before starting the descent
Practical tip: Put on your windbreaker or waterproof jacket before you reach the summit, not after. The cold sets in within minutes, and digging into your pack at the pass in the wind is a waste of time and energy. Think of your outfit as a tool that you adjust according to the terrain—not once the problem has already arisen.
Nighttime segments: what many people forget
Nighttime changes the physiology of running. Your metabolism naturally slows down between 1 a.m. and 4 a.m., heat production from exertion decreases, and the temperature often drops by 5 to 10°C compared to daytime.
How this affects your outfit:
- The short-sleeved T-shirt you started with isn’t enough anymore—switch to a long-sleeved base layer
- Gloves and a beanie—which you may have stashed at the bottom of your bag—become essential even in temperatures that seem “mild” during the day
- A buff around your neck makes a real difference in how warm your throat and neck feel
Preparing for a 23°C temperature range: a real-world example
On a typical Pyrenean ultra, you might start at 4 a.m. at 25°C in the valley, pass through a high-altitude refuge at 7°C in a strong wind, and finish at 30°C in the early afternoon. In this case, there’s no such thing as a “single running outfit.” There’s a specific outfit for each segment:
- Start and first climb: technical T-shirt + shorts
- High-altitude section: windbreaker + lightweight gloves taken out of the pack before the pass
- Return to the valley in hot weather: back to the T-shirt, reapply sunscreen, fill your water bottle
- Final segments > 28°C: breathable tank top, cap, sunglasses
This isn’t improvisation. It’s preparation.
On Segly: the weather feature analyzes the forecast conditions for each segment of your route—temperature, wind, precipitation—and recommends the appropriate attire for each section. You’ll know in advance at which aid station to pull out your jacket and at which pass to brace for the cold. Learn more about segment-by-segment weather →
Conclusion
Choosing what to wear for an ultra-trail is first and foremost about reading the course. Not the general weather forecast—but the terrain, the segments, the elevations, and the times you’ll be passing through them.
Gear mistakes rarely cost you the race on their own. But they cost you energy, focus, and sometimes even safety. Putting on a warm layer at the right moment means 10 minutes of cold avoided and just as much energy saved for later.
The next time you’re preparing for an ultra, don’t ask yourself “what the temperature will be,” but rather “what the temperature will be on each segment, at what time, and at what elevation.”
Segly analyzes the weather forecast for each segment of your route and recommends the right gear—from the high-altitude pass to the finish in the valley. Import your GPX track and prepare for your next ultra →